cjDrums: Drumpad with a twist

After a mad weekend of experimenting with OpenGL and the Sound API’s of android i got this demo-application that was just beyond the state of demo. So i decided to release it as it is. Maybe someone will find a creative use for it.

cjDrums: Basic drumpad app with a twist! Depending on where you hit the pad, the pitch will differ. You can load your own samples and save/load drumkits.

Recording audio on Ubuntu while watching TV with my android phone

First a bit of background: I hooked up my TV to a linux-box running Ubuntu. As a mediaplayer i use XBMC which also has a nice Android app for remote control. Something i miss though, is an easy way to record audio while watching. I use a lot of movie-samples (voices, fx, drones) in my music and i’m always looking at easier ways to get a bunch of samples. But here comes Remote Launcher to the rescue!

This app lets you run custom commands and shellscripts with the click of a button on your phone.

Here’s how i did it:

  • Download Remote Launcher server here and install it. Make sure to have java6 installed (apt-get install sun-java6-bin sun-java6-jre)
  • Now we do a testrun: remote-launcher-server -d

    Fill in a password twice. You only have to do this once. If you see a message that it’s running on port 4444. You’re set, and you can just CTRL-C again. The important thing is that you now will have a ~/.remotelauncherserver configuration file.

  • To make sure this server gets started whenever we reboot, we put the startup in /etc/init.d/remotelauncher
    #! /bin/sh
    ### BEGIN INIT INFO
    # Provides:          remotelauncher
    # Required-Start:    $local_fs $all
    # Required-Stop:
    # Default-Start:     2
    # Default-Stop:
    # Short-Description: Start the Android Remote Launcher daemon
    # Description:       See http://owtroid.com/remotelauncher/mediawiki/index.php?title=Remote_Launcher
    ### END INIT INFO
    #
    
    PATH=/sbin:/usr/sbin:/bin:/usr/bin
    NAME=remote-launcher-server
    DAEMON=/usr/bin/remote-launcher-server
    
    [ -x "$DAEMON" ] || exit 0
    
    case "$1" in
      start)
            echo "Starting remote-launcher-server"
            start-stop-daemon --start --background --user YOUR_LINUX_USER_NAME --make-pidfile --pidfile /var/run/remote-launcher-server.pid --exec $DAEMON --chuid YOUR_LINUX_USER_NAME -- -d
            ;;
      stop|restart|force-reload)
            echo "Stopping remote-launcher-server"
            start-stop-daemon --stop --pidfile /var/run/remote-launcher-server.pid
            ;;
      *)
            echo "Usage: $NAME {start|stop|restart|force-reload}" >&2
            exit 3
            ;;
    esac
                
  • Make sure it gets linked to the correct rc.d: chmod 755 remotelauncher; update-rc.d remotelauncher defaults 96 02
  • Now we need some scripts to start and stop recording.

    ~/scripts/startrecord.sh

    #!/bin/sh
    
    date=`date +"%Y-%m-%d-%k-%M-%S"`
    filename="/data/Recordings/rec_$date.wav"
    /usr/bin/rec "$filename"


    ~/scripts/stoprecord.sh

    #!/bin/sh
    /usr/bin/killall -9 rec
    
  • Make them executable: chmod 755 ~/scripts/startrecord.sh ~/scripts/stoprecord.sh
  • Now we’re ready to configure remotelauncher to use them. Edit ~/.remotelauncherserver and put the following code in there. Make sure to change the paths of the scripts to the correct paths!
    ######## Remote Launcher Server config file ########
    #
    # Add entries in the following format:
    #   Name
    #   Description
    #   Path
    #
    # Example:
    #   Notepad
    #   Launch the Notepad editor
    #   c:\windows\system32\notepad.exe
    #
    # Visit http://sf.net/apps/mediawiki/remotelauncher/
    # for more details and examples.
    #
    # Blank lines or lines beginning with # are ignored.
    
    XBMC
    Start XBMC media center
    /usr/bin/xbmc
    
    Kill XBMC
    Kill XBMC media center
    /usr/bin/killall xbmc
    
    Record
    Start recording
    /home/cjpa/scripts/startrecord.sh
    
    Stop Record
    Stop recording
    /home/cjpa/scripts/stoprecord.sh
    
  • Now we can start and stop XBMC through the Remote Launcher as well as Start and Stop recording. Just run /etc/init.d/remotelauncher start and we’re ready to control our computer from our android device
  • Install the free Android App
  • Once installed you’ll have to add your server and you’re set!
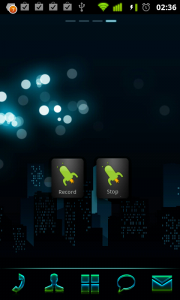
  • The coolest thing about this app is, that you can make a homescreen widget to run 1 of the commands you configured. This makes it super-fast to launch remote scripts from your homescreen!

Telenet Autologin on OSX

People who want to autologin on a Telenet Hotspot with their MacBook, here’s a recipe you can use for that.

By far the most reliable way to do this is using crankd that, in a very similar way to launchd, allows you to run scripts in response to events such as network changes, filesystem activity, and application launching. The process to get started is not terribly complicated, but it requires some editing of system files.

  • First lets make a script that will handle the login. Open up an editor and put the following in:
     
    #!/bin/sh
    tn_user=YOUR HOTSPOT LOGIN
    tn_pass=YOUR HOTSPOT PASSWD
    CURL=`which curl`
    
    SSID=`/System/Library/PrivateFrameworks/Apple80211.framework/Versions/Current/Resources/airport -I | awk '/ SSID/ {print substr($0, index($0, $2))}'`
    if [ "$SSID" = "TELENETHOTSPOT" ]; then
       $CURL -v -L -d checkterms=1 -d terms=on -d c=std -d lang=nl -d userid=$tn_user -d password=$tn_pass "https://portal.telenethotspot.be/logon/welcome.jsp";
    fi
  • Save that file somewhere, let’s say i saved it in: /Users/cjpa/scripts/autologin_tnhotspot.sh
  • Download and install PyMacAdmin, this includes crankd.
  • Once installed, open a terminal and run /usr/local/sbin/crankd.py. If for some reason it crashes with an error about an undefined NSNotificationHandler, don’t worry. You can safely disregard that. If it didn’t crash type Ctrl+C to exit the program. The important point is that it would have created an example configuration file in:
    ~/Library/Preferences/com.googlecode.pymacadmin.crankd.plist.
  • Open the configuration file in a text editor and modify it so that it looks like the following:
    <?xml version="1.0" encoding="UTF-8"?>
    <!DOCTYPE plist PUBLIC "-//Apple Computer//DTD PLIST 1.0//EN" "http://www.apple.com/DTDs/PropertyList-1.0.dtd">
    <plist version="1.0">
    <dict>
        <key>SystemConfiguration</key>
        <dict>
            <key>State:/Network/Global/IPv4</key>
            <dict>
                <key>command</key>
                <string>/Users/cjpa/scripts/autologin_tnhotspot.sh</string>
            </dict>
        </dict>
    </dict>
    </plist>
  • Now we can try it. Run /usr/local/sbin/crankd.py in a terminal and disconnect your wireless. Reconnect again and check in the console if you get output like this: INFO: SystemConfiguration: State:/Network/Global/IPv4: executing /Users/cjpa/scripts/autologin_tnhotspot.sh
  • If you do, everything is in working order and we are ready to set crankd to start automatically on reboot.
  • Let’s make a file ~/Library/LaunchAgents/org.crankd.plist and put the following in it:
    <?xml version="1.0" encoding="UTF-8"?>
    <!DOCTYPE plist PUBLIC "-//Apple//DTD PLIST 1.0//EN" "http://www.apple.com/DTDs/PropertyList-1.0.dtd">
    <plist version="1.0">
    <dict>
        <key>KeepAlive</key>
        <true/>
        <key>Label</key>
        <string>org.crankd.plist</string>
        <key>ProgramArguments</key>
        <array>
            <string>/usr/local/sbin/crankd.py</string>
        </array>
        <key>RunAtLoad</key>
        <true/>
    </dict>
    </plist>
  • We have created a launchd item which will start everytime your laptop boots. You can start it manually with the following command: launchctl load ~/Library/LaunchAgents/org.crankd.plist
  • That’s It! Now go look for a hotspot..

Based on the following blogpost: http://qscripts.blogspot.com/2011/03/run-script-in-os-x-on-network.html